

Laser Cutting Designs and Plans: 6 Steps - 2021 - Gwsi geps.
List Table:
- Goods
- Step 1: Create a new Photoshop project
- Step 2: Put the first image in one layer
- Step 3: Place the second image in the second layer
- Step 4: Insert the letter and clear the design
- Step 5: Finish the design
- Step 6: The final product

Laser Cutting Designs and Plans: 6 Steps - 2021 - Gwsi geps.
- Goods
Laser Cutting Project: Creating an interesting design that represents itself that can cut into a laser printer

Laser Cutting Designs and Plans: 6 Steps - 2021 - Gwsi geps.
- Step 1: Create a new Photoshop project
Obviously, like everything in the world, I started with a blank slate for a design laser cutting project. The layout was American paper, 8.5 inches wide and 11.0 inches tall.

Laser Cutting Designs and Plans: 6 Steps - 2021 - Gwsi geps.
- Step 2: Put the first image in one layer
Then, I found a picture of a tree and its roots by typing "tree roots slate" into Google. That's why I wanted to put a tree in my design because that's why I have less insects that live longer like the forest. Also, a salon lite of the tree is often used in old Asian drawings. I thought these slides were so beautiful and elegant. What I wanted to do with this picture was to cut the roots of the tree and when I put this design in the laser printer, half of it was left on top. Details will be described below as I walk through the pictures below.

Laser Cutting Designs and Plans: 6 Steps - 2021 - Gwsi geps.
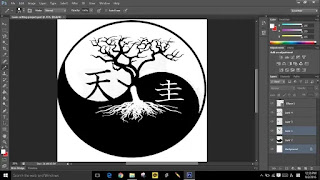
- Step 3: Place the second image in the second layer
In this section, I create a new layer and I insert a symbol that is in the center of the Korean flag. The original image is red (top) and blue (bottom), but I changed them to white and black so that the laser printer could understand which parts to cut. In this case, the whites will be cut. Based on the dependent line in the center, the roots below the dependent line will be changed to white.

Laser Cutting Designs and Plans: 6 Steps - 2021 - Gwsi geps.
- Step 4: Insert the letter and clear the design
Before turning the roots white, I put two characters in my design. Since my design focused on the black and white contrast, I made a letter to live in another Eclipse. Both of those letters are my first name in Chinese characters (Chen Qiu: Also, I will try to clarify my scope. In this move, when I use a pen to remove small white lines around objects) I had to be very careful with it when using the tool. I used "many" because it made many mistakes in cleaning small parts.
Laser Cutting Designs and Plans: 6 Steps - 2021 - Gwsi geps.
- Step 5: Finish the design
Finally, I changed the roots of the tree to white so that they could be cut in a laser printer. I left a few areas of the center of the tree to connect the largest part of the tree with the dark parts so that the tree does not separate when the laser printer cuts it. I try to leave the roots to use it because I want them to look natural. Throughout the process, I always used the "magic twist tool" tool to select things. I use pixlr.com before using Photoshop, and the magic band is always necessary to create a good design. Was because it automatically selects the item I want to edit. Below is my final design.

Laser Cutting Designs and Plans: 6 Steps - 2021 - Gwsi geps.
- Step 6: The final product
With my professor, Cobbin, I put in an Achilles laser printer, and I got a pretty good product. There were some disappointments - the surface was straight but in some places very bad. However trees and letters come out of the region, so I can identify all parts of them.
Also About Read This Link:
2 Comments
Assalam u alikum o bhai lathe machine ma ya programme nhi ha laser machine ka bara ma batao us ka programme ka bara ma nhi ok
ReplyDeleteOr ya laser cutting machine ya or hi kuch ha laser machine or ha
ReplyDelete